When you take a photo or shoot a video, are you an expert on lighting? Maybe you don’t want to take the time to master lighting techniques, and that’s perfectly fine because you don’t have to. But you do need to know what ISO is if you want to take a half decent photo or shoot even an okay frame. Why? Well, being able to answer what is ISO means you understand two other components of the camera – shutter speed and aperture.
And if you know how to use all three together, not only will your shots look great, your ability to take a beautiful shot will be intentional, instead of accidental. Let’s jump in.

Watch: Ultimate Guide to Camera ISO
Subscribe for more filmmaking videos like this.
ISO Meaning
Getting to know ISO
ISO stands for the International Organization of Standardization.
This organization is the main governing body that standardizes sensitivity ratings for camera sensors. But that's just trivia — it’s better that we know what ISO is and how it works when we snap a photo, or shoot a video.
ISO Definition
What is ISO?
ISO is what measures your camera’s sensitivity to light. More specifically, how sensitive the digital sensor is to light, (it also measures the film’s sensitivity, if using a traditional camera). It is represented in numbers such as 50, 100, 200, 400, 800, 1600, 3200, etc. When you change the ISO on a digital camera, you’re rendering the sensor more or less sensitive to light.
The lower the ISO number, the less sensitive the sensor is to light. High ISO numbers have high light sensitivity. So, when you change the ISO from 100 to 200, you are doubling the sensor’s sensitivity.
In well-lit environments, a lower ISO (200 or below) should be used. When shooting in low-light situations, a higher ISO (400 or above) is best.
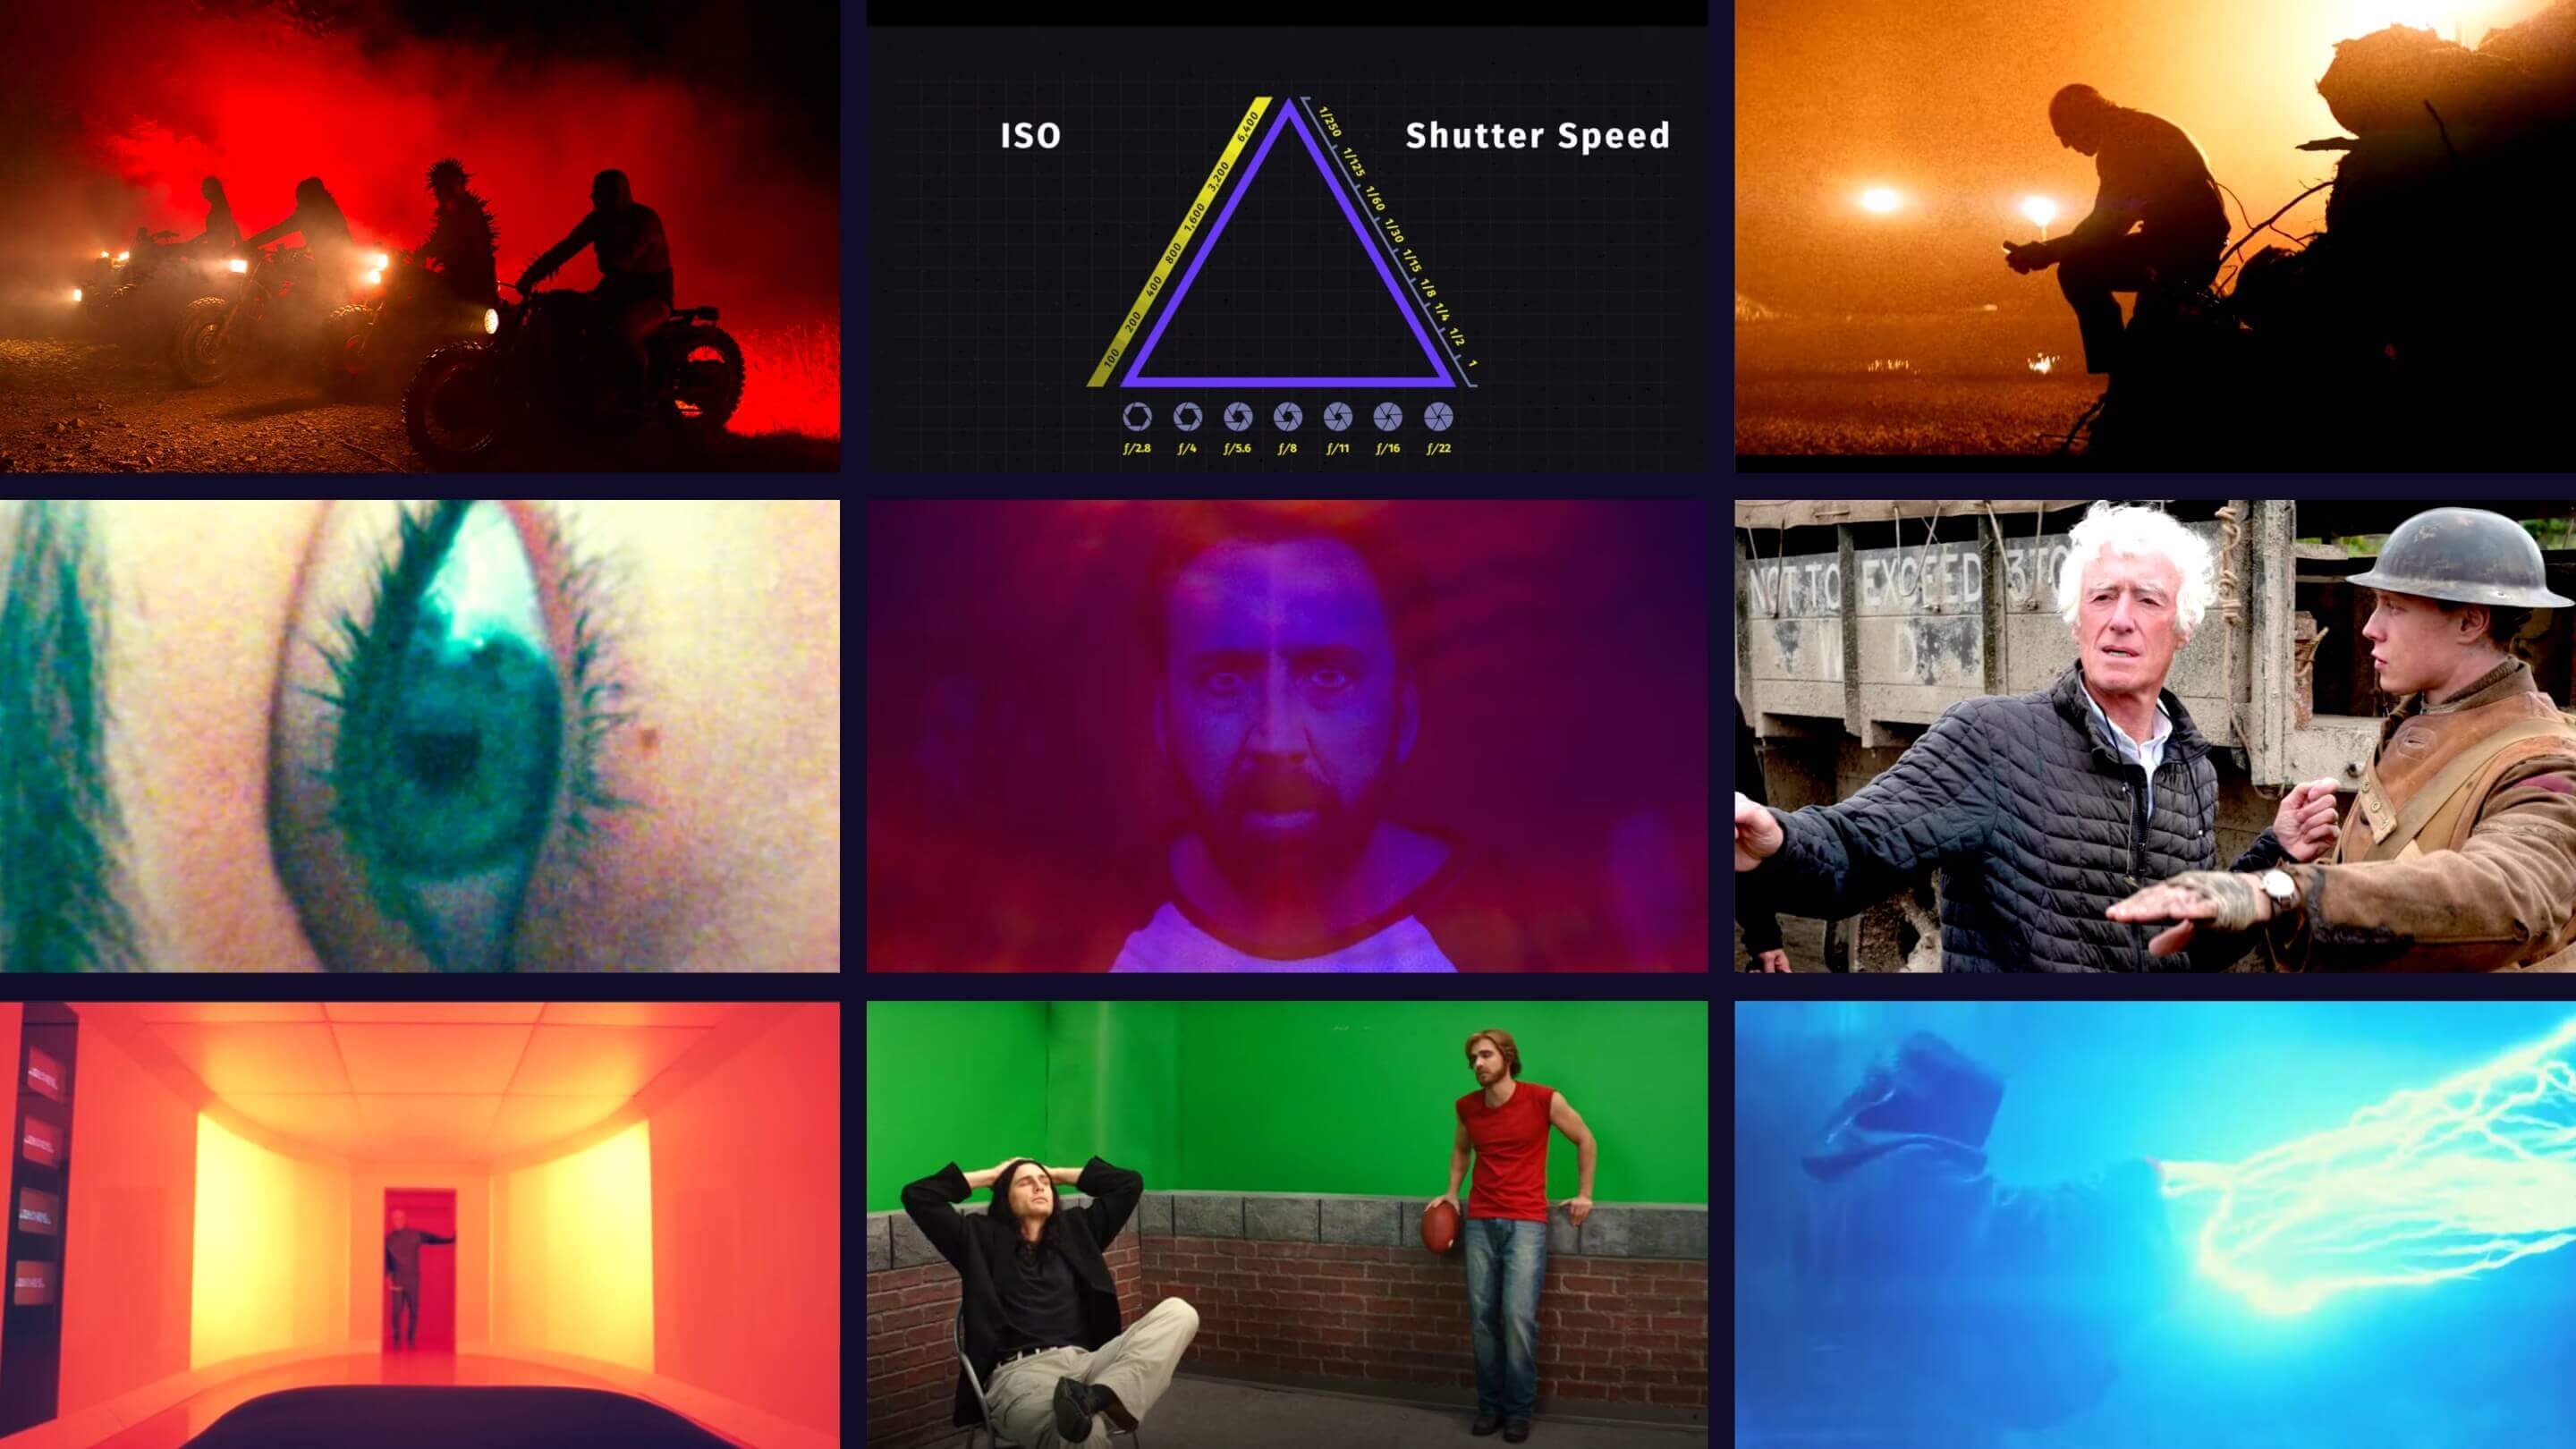
ISO 100 is considered standard. Higher numbers are best for darker situations. But keep in mind, higher ISO could cause grainy images. ISO is only one point on the exposure triangle, which also includes shutter speed and aperture. Using all three — ISO, aperture, and shutter speed, help to balance an image’s grain and exposure.
Here’s a video that shows you how ISO works in less than a minute. Once you've seen the differences your ISO setting can create for an image, we'll move to how it works in combination with the other two important settings: aperture and shutter speed.
Quick overview of ISO
ISO doesn’t work alone, it is simply one camera setting that affects your image. We also need to consider the camera sensor size, for example. Let’s see what happens when we combine these settings and what kinds of images you can create.
The Exposure Triangle can be a tricky concept but we've got a resource that will explain everything. Download our FREE "Ultimate Guide to Exposure" and get started shooting!
Free downloadable bonus
FREE Download
Ultimate Guide to Exposure
The Exposure Triangle is something every photographer and cinematographer needs to master. Download our FREE e-book to get in-depth explanations and tutorials on topics like aperture, ISO, shutter speed, and how to balance these settings to nail perfect exposure every time.


UNDERSTANDING ISO
ISO + shutter speed + aperture
The ISO determines how sensitive the camera’s sensor is to light. So, if we’re in a poorly-lit room and we have low lighting, what do we do?
Well, raising the ISO to 3200 isn’t necessarily the solution. We don’t want overly grainy images, and we want to make sure we use the other lens settings to get the most out of our camera’s capability.
Striking the perfect balance, or near perfect, between ISO, shutter speed, and aperture is critical.
Before we get into an example, check out the video below. It lays out just how the three concepts work together to create consistent high-quality images and footage.
How ISO fits into the exposure triangle
Shutter Speed and Aperture
If you haven’t read our other articles on shutter speed and aperture, we recommend taking a look.
So, what’s shutter speed? Shutter speed is how fast the shutter inside the camera opens and closes. The speed of the shutter determines two very key things — light and motion. If you set a slow shutter speed, that means the shutter is open for longer, and a ton of light gets in, and if the subject is moving, they will appear blurry.
Shutter Speed Guide • Subscribe on YouTube
The opposite is also true. If you have a fast shutter speed, only a small amount of light will get in, and you’ll only be catching a very quick snapshot in time, so there won’t be any blur. But again, your image could turn out pretty dark. This is where ISO comes in.
Did You Know?
If your subject is moving and you’re trying to freeze the motion, a higher ISO will allow for that fast shutter speed you need.
We’ll see what this looks like in just one second. But we’ll also need to see how aperture fits into all of this.
Aperture is the opening of the lens through which light passes. When you hit the shutter release button to take the picture, a hole opens to capture the image. The aperture is the size of that hole.
The larger the hole, the more light gets in, and the smaller the hole, the less light. They’re measured in f/stops. The smaller the number f/stop, the larger the size of the hole. If this is a little confusing, don’t worry. It is for everyone initially.


Understanding aperture
But aperture also affects how blurry the foreground and background are in the frame, or what’s referred to as depth of field.
The larger the aperture, the larger the opening in the lens, the blurrier the background. A “thin” or “shallow depth of field" are common terms to use for this. A small hole or aperture will yield sharper images, something commonly referred to as a large or “deep depth of field."
Here's a video breakdown of the hand-in-hand relationship camera aperture settings have with achieving depth of field.
What is Aperture? • Subscribe on YouTube
What if you only want the subject to be in focus, and you want the background to be blurry? The aperture will have to increase. And when the aperture increases, more light will be let in. So you may have to lower your ISO just a bit, to not overexpose the image.
So, let’s try a scenario. The goal is to photograph a nighttime football game. How can we adjust the camera settings to capture an image like the one below? Let's go through it step-by-step.


Use ISO with other settings to get the image you want
GOALS
Let's look at the image to note the qualities we are trying to capture.
- Deep depth of field (subjects and background both in focus)
- Freeze frame on subjects in motion (little to no blur)
Now we have our target qualities in mind, let's go through the settings we need to make them happen.
DEPTH OF FIELD
Both the foreground and the background are mostly in focus. In fact, the football field and the back fence are pretty sharp. This can be achieved with a small aperture and a fairly high ISO. It is at night, so we know we’ll need our sensor to be more sensitive to register more light.
FREEZE FRAME
If we want to capture the moment they’re in the air, we can’t slow down the shutter speed or they’ll come out all blurry. So, in order to get the frozen motion we want, we need a fast shutter speed.
RECAP
To capture this image, we need the following:
- Small aperture
- High-ish ISO
- Fast shutter speed
If we wanted to make the image more dramatic by blurring the background, we could open the aperture to create a shallow depth of field. But once you do that, you’d have to adjust the ISO and shutter speed to keep the image well-lit and frozen as it is above.
Once you know how all three work in unison, it’s up to you as the creator to test out shots and see what you like best.
Free downloadable bonus
FREE Download
Ultimate Guide to Exposure
The Exposure Triangle is something every photographer and cinematographer needs to master. Download our FREE e-book to get in-depth explanations and tutorials on topics like aperture, ISO, shutter speed, and how to balance these settings to nail perfect exposure every time.
Up Next
Understanding depth of field
Hopefully by now you’ve read three articles on shutter speed, aperture, and ISO. Understanding the exposure triangle and how they all work together is critical to taking consistent high-quality photos and footage. But exposure isn’t the only factor in quality visuals. Playing around with sharpness and blur brings some creativity to your craft. Let’s take it to the next level and master depth of field.
Up Next: Depth of field essentials →

Showcase your vision with elegant shot lists and storyboards.
Create robust and customizable shot lists. Upload images to make storyboards and slideshows.

