Intro to Storyboarding
In this course, we will explain the entire process of creating, populating, customizing, and sharing a storyboard in StudioBinder.

In this video, we will explain the entire process of creating, populating, customizing, and sharing a storyboard in StudioBinder. We make a few storyboard variations to cover various use-cases.

In this first lesson, we start from scratch by creating our first storyboard. You can create a storyboard in StudioBinder either with or without a script. If you import a script, every scene will be automatically generated along with its associated script content — convenient to read and visualize every scene as you go.
Once all of your scenes are created, you can add blank images or import existing images to each. You can also adjust your layout, aspect ratios, and details to display.
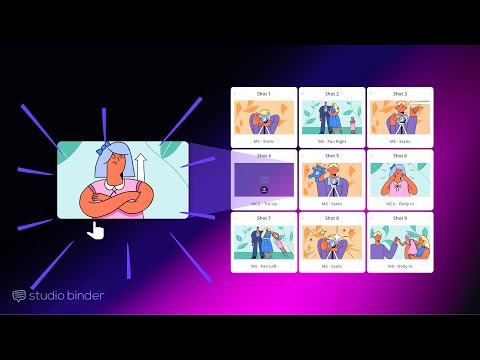
With your storyboard created, you can start populating it with frames and images. You can do this manually or by tagging frames from the script itself. Just open the script preview and click the line you’d like to add an image for. Then, you can upload images to add to each frame or pull from your existing media library. You can even take a screenshot with your webcam of a storyboard and import it that way.
Once images are added to your storyboard, you can annotate arrows and text. That way, any movement from the camera or subject is perfectly clear when you share the storyboard.

Take a look at most storyboards, and you’ll quickly notice a recurring shape: the arrow. Arrows help storyboards overcome their primary shortcoming when planning out shots. Storyboards are still images. Movies are moving images– it’s in the name.
Today, we break down the use of arrows in storyboards while showing you how to create them in StudioBinder’s storyboard software.

Now that your storyboard has images, we can customize the layout. Here, you can toggle between showing or hiding audio and video descriptions. Or you adjust the aspect ratio to find the perfect frame size. Finally, you can add scene numbers to keep your entire storyboard organized and clear.

In this lesson, we discuss how to make changes to your storyboard after revisions are made to the script. First, start by importing and syncing the new script version to your project. Any storyboards associated with specific scene numbers will not be affected. But, for example, if the old Scene 1 is now Scene 1A, those images will need to be moved.
If storyboards from a previous scene are no longer present, don't worry — they haven’t been erased, only archived. To restore them, open the Archived Storyboards sidebar tab, find the right images, and make them “active” once more. Then they can be added to correct scene once again.

In this lesson, we discuss how to export a storyboard PDF with customizable layouts, details, stylings, and more. You can always send share links straight from your project, but sometimes a PDF is required. Simply select all storyboards (or from a specific group), customize the display with borders, selecting black and white or color, hiding or showing shot specs, adding a watermark, and more.

Watch how the duo from ThirdStringKicker uses StudioBinder to pitch in a branded content ideas for a motor oil product.
More videos
Storyboarding
Shot Listing
More Examples

Support Desk
Still haven't found what you're looking for?