Intro to Screenwriting
For screenwriters, using dedicated scriptwriting software is the best way to make the process easier and give your work the professional look it deserves. In this screenwriting tutorial, we’re going to walk through the functions and features of StudioBinder’s screenwriting software. Screenwriting software is not complicated, but these best practices will help you understand it completely.

In this first lesson, we will show you get started writing a new screenplay from scratch. If you have a script already started in another screenwriting app, we'll also show you how to import the file and continue writing in StudioBinder.

In this lesson, we will review basic screenplay formatting.
In this screenwriting tutorial, we’re going to walk through the functions and features of StudioBinder’s screenwriting software. This installment explains how to add or omit scenes from a locked screenplay.
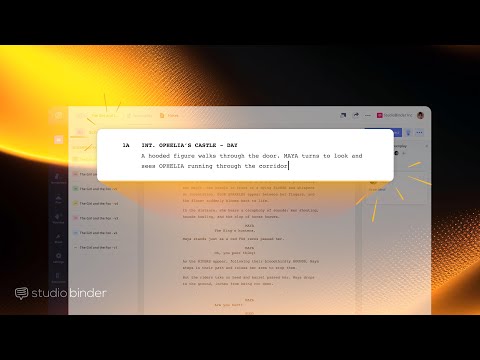
When a screenplay is locked, the scene numbers don’t change whenever a scene is added. For example, if we add a new scene between Scene 5 and Scene 6, that new scene is labeled 5A. Likewise, if a scene is omitted, the scene number stays intact.
The consistency of scene numbers in a script is vital when departments must collaborate during the production process. Scene 5 should always remain Scene 5. If it’s necessary to reorder the scenes, this is also possible, but, as we’ve already mentioned, should be done rarely, if ever, to maintain consistency and, therefore, efficiency down the line.

This lesson explains how to create new versions of a screenplay and how to manage those revisions. No script has ever been written in a single draft. Writing is re-writing, they say! This creates a problem for writers who want to keep all drafts of their script and organize them in a single location.
Another common situation is when you want to revert back to a previous version — all you have to do in StudioBinder is open the revision manager, find the archived version, and click “make current.” It’s as easy as that.

This lesson covers the simple yet essential task of syncing a script to a StudioBinder project. StudioBinder includes a suite of pre-production solutions like storyboards, script breakdowns, call sheets, and more. But none of these can work without first syncing a script to the entire project.
To sync a script, you can either import a script file, or write natively in StudioBinder and press the "Sync" button ready. Update the script color, and file name. You can double-check and compare the “old version” and the “new version” being synced and then click the “Sync Script” button and it’s done! Now you can continue working on the project with the most up-to-date script version.
Note: You can go back and edit your screenplay at any point, but the modifications will not be updated across the project until you choose to re-sync the script.

In this screenwriting tutorial, we're going to cover how to export a screenplay in StudioBinder and how to create a custom PDF with watermarks, headers/footers, and a title page.
First, you’ll want to create a title page that includes the title, your name, and possibly the draft date.
Then, in the upper right corner, you’ll find the option to “Download PDF” — you can also add a watermark, header, or footer for extra clarity and security.
More videos
Getting Started
Pro Tips
More Examples

Support Desk
Still haven't found what you're looking for?