Roger Deakins is one of our favorite cinematographers to study because he is always pushing the envelope. Case in point, we’ll take a look at some “Deakinizer” lenses. We’ll give you a brief history of why he decided to alter lenses for an intended tilt-shift look. We’ll show you tilt-shift lens examples via cinematographer Kaity Williams from ASC Magazine. Before we jump into the “Deakinizer,” here’s a video breakdown of his work in 1917.
Tilt-Shift Lens
Deakinizer origins
For a better understanding of the origins behind the Deakinizer, we need some context. In another post, we go into further detail on what a tilt-shift lens is and how to use them with creative examples.
When Roger Deakins was preparing for The Assassination of Jesse James by the Coward Robert Ford, he wanted a distinct vintage tilt-shift look. But he wasn't satisfied with the current tilt-shift lens options available at the time. Let's begin by defining Deakinizer lenses.
Deakinizer Lens Definition
What is a Deakinizer lens?
A Deakinizer lens is a modified tilt-shift lens that creates visual elements such as color diffraction and vignetting around the edges. In short, the look of a Deakinizer lens is based on these imperfections and the textural qualities they produce. The lens was specifically designed for Andrew Dominik's film The Assassination of Jesse James by the Coward Robert Ford, a Western drama shot by Deakins.
USING A DEAKINIZER LENS FOR:
- Creating vignetted images
- Color diffraction
- Blur select sections
- Change scale — create miniature effect
It's all well and good to discuss tilt-shift and Deakinizer lenses, but the effect is purely visual — so let's look at some examples. The physics of how these lenses work is straight-forward but the effects are nothing short of mind-bending and jaw-dropping.
This video details tilt-shift lenses and how they work. This is the baseline from which the development of the Deakinizer started.
How a tilt-shift lens works
Now we have an understanding of the possibilities of a tilt-shift lens but you can also see that they don't have that specific look Deakins was going for. In essence, he wanted a lens that looked like it might have been developed at the time. It is the perceived 'imperfections' that define what a Deakinizer lens can do. Here's how they did it.
TILT-SHIFT LENS VIDEO
Deakinizers give you the tilt-shift look
Roger Deakins was looking for that vintage look — something that would better resemble the photographic technology of the time period. So, he reached out to Dan Lopez and Steve Hamerski at Otto Nemenz to see if they could customize lenses with special elements.

Assassination of Jesse James by the Coward Robert Ford
What they got was a dreamy and soft image with clarity in the center and edges that were blurry and smeared. The result of this tilt-shift lens combination became known as the “Deakinizer” lenses. Yet another one of the various types of lenses cinematographers have at their disposal.
Deakinizer Lens Footage • Kaity Williams
How did Roger Deakins find this specific look?
The story goes that Roger Deakins went to Otto Nemenz with your run-of-the-mill 50mm lens, but he also brought something else — a single optical element. Deakins held this optical element in front of the lens to illustrate the kind of look he was hoping to achieve.
From there it was up to Dan Lopez and Steve Hamerski to find a way to alter a lens that would give Deakins the intended effect. According to Deakins’ blog, Lopez and Hamerski took a wide-angle Kinoptik lens and very simply removed an element.
This made the lens a bit faster, and created color diffraction and vignetting around the edges. Deakins wanted more, though, and Lopez and Hamerski eventually landed on a combination of Arri Macro primes and a collection of single-element attachments to each lens.
How to make DIY Deakinizer • Deakinizer
Related Posts
Tilt-Swing Lens Video
Kaity Williams testing “Deakinizers”
Cinematographer Kaity Williams actually went out and did the leg work so she could try out the “Deakinizers,” and then reported her findings in the ASC magazine. What did Kaity find out about the “Deakinizers”?
Williams went down to Otto Nemenz with Jay Holben and model Becka Adams to test out these lenses first hand. She first tested what she calls “Deakinizer #1,” which is the modified wide-angle Kinoptik. The lens had the dreamy look she was hoping for but also found that, with the removal of a single element, the focal length shifted to around 44.5 mm.
Kaity then tried some of the other Deakinizers (2, 2a, 3) which are single-element attachments. These attachments can then be combined with what is referred to as a “taking lens.”
A “taking lens” simply refers to a prime lens that is nearest the digital sensor or film stock when you have a combination of lenses. Combining multiple lenses creates a “signal chain,” so the “taking lens” is the one that is the final link in the chain before the image is captured.
Kaity took the “Deakinizer elements” and paired with “taking lenses” which consisted of an Arri 32mm AECM T/2.1, an Arri 50mm AECM T/3, and an Arri/Zeiss 60mm T/3.
The single element attachments were then placed in front of the lens. There were two ways to do this, either with a bellows adjustment or attached a swing-tilt mechanism that would facilitate all kinds of adjustments including side-to-side, forward and back, up and down.
Related Posts
Tilt-Shift Photography
Examples from the “Deakinizers”
Here is a still image from the Deakinizer #1: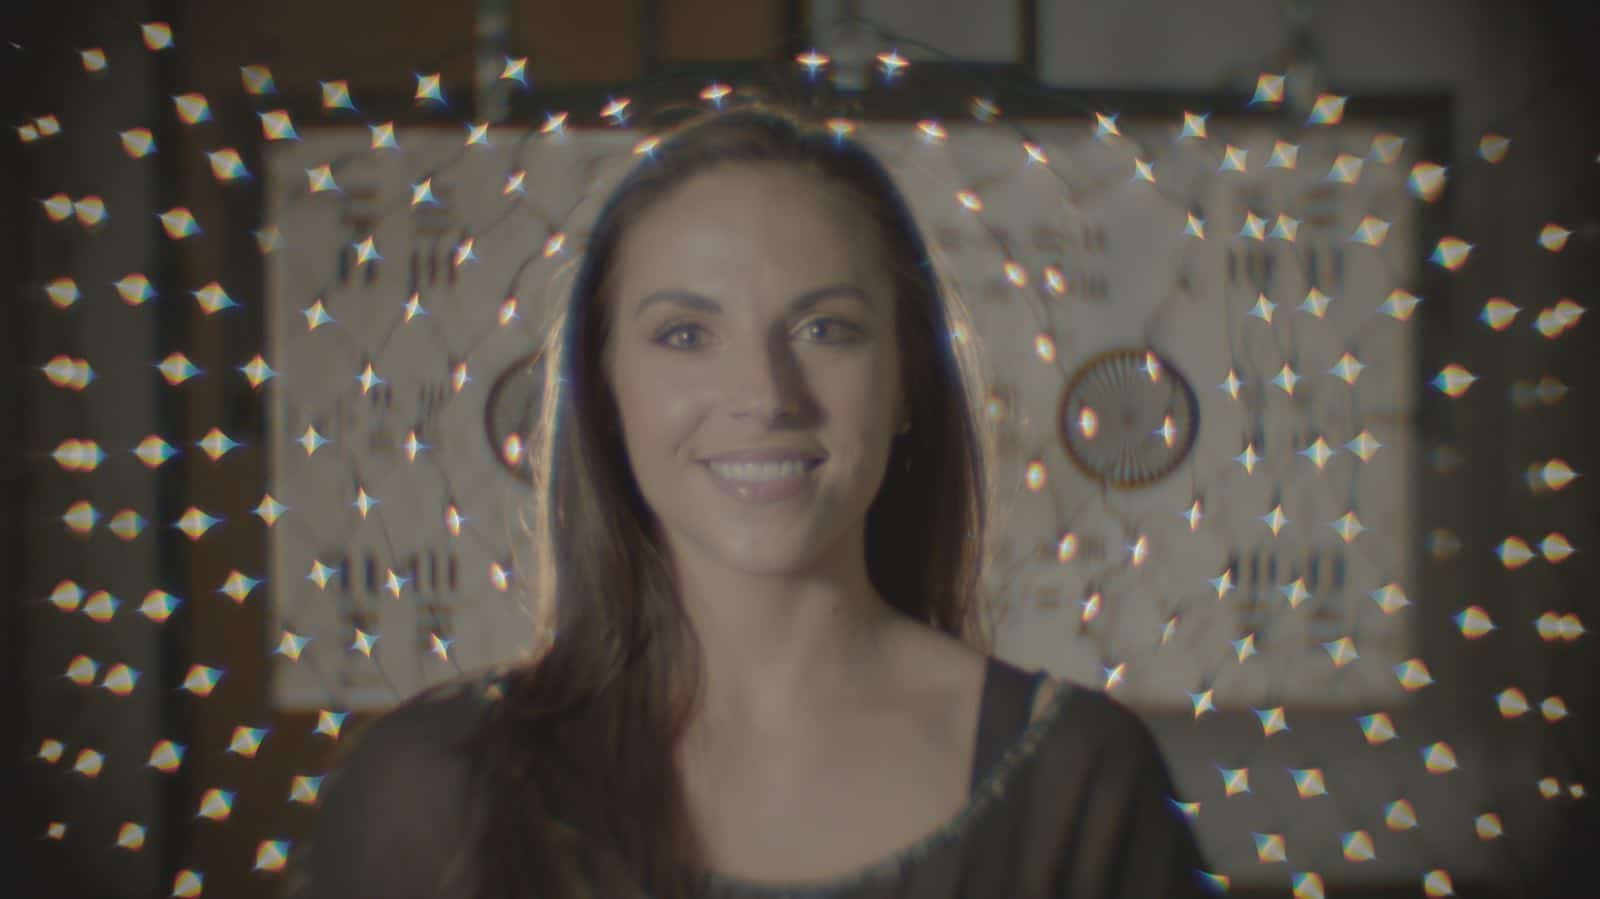
Deakinizer Element #1 Example
This particular image was shot at F/2.3. Notice how the subject is relatively crisp and clear, and how the image shifts around the edges.
Here is a still image from the Deakinizer #2:
Deakinizer Element #2 Example
Notice how the bokeh at the edges is stretched.
Here is a still image from the Deakinizer #3: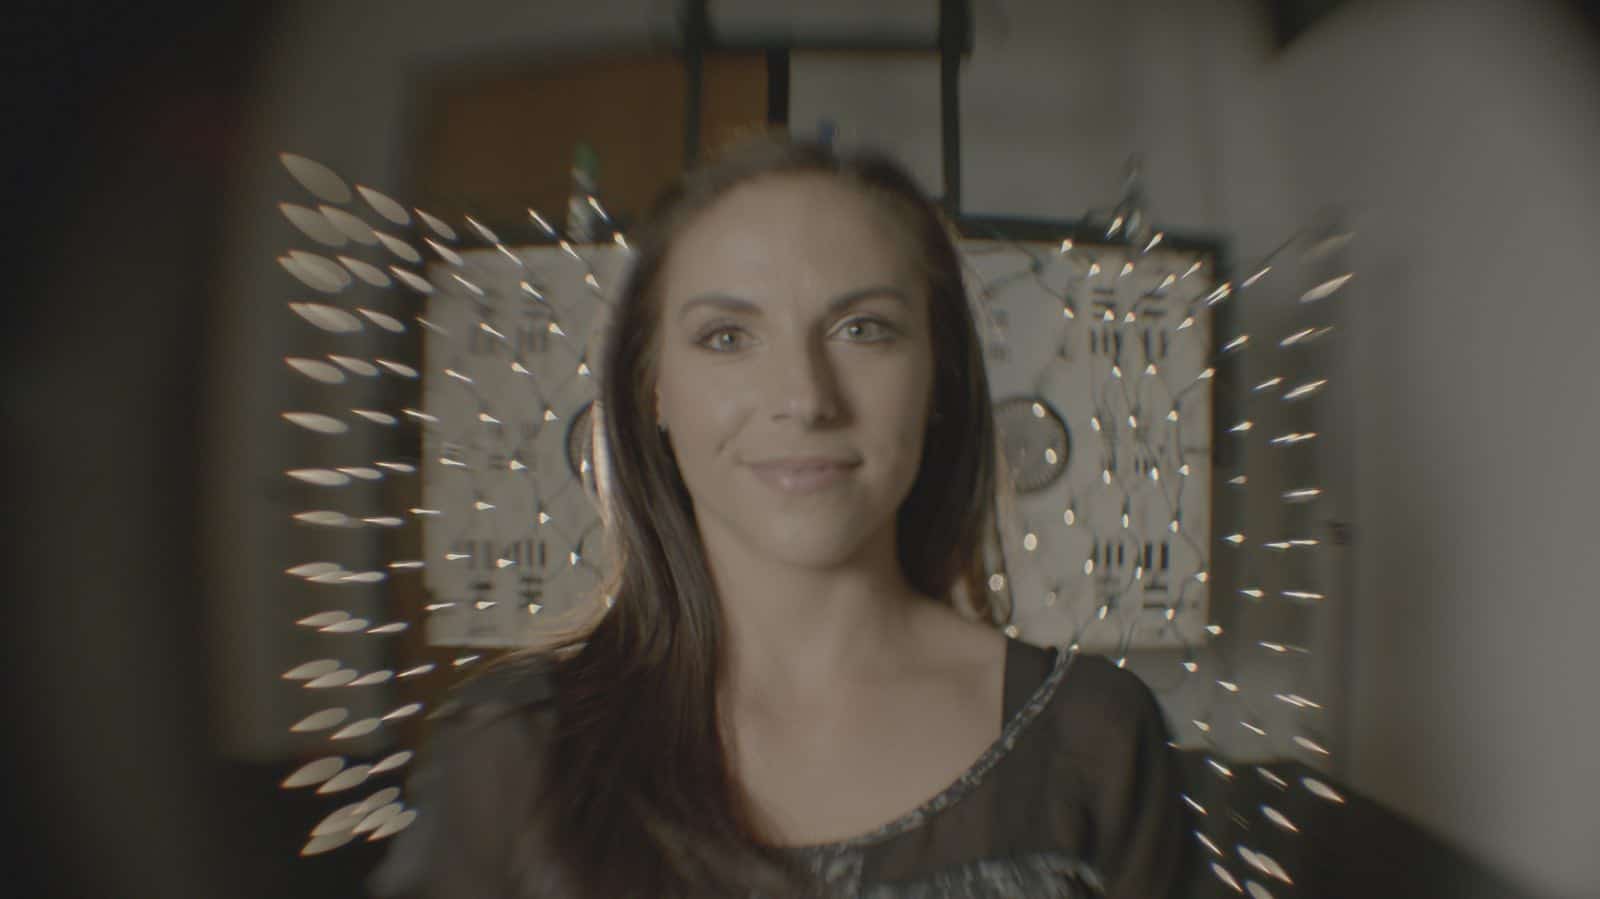
Deakinizer Element #3 Example
Special thanks to Kaity Williams and her team for venturing down to Otto Nemenz to test the “Deakinizer” lens elements. Roger Deakins isn't afraid to alter his filmmaking tools to get a specific look, and hopefully, it inspires you as a filmmaker to do the same with your own projects.
UP NEXT
Roger Deakins visual style guide
If you’re into cinematography or working as a director of photography make sure to check out Roger Deakins' Visual Style Guide. We collected all of the best tips and tricks offered by one of the greatest living cinematographers and provide examples with helpful diagrams.
Up Next: Deakins Style Guide →
Showcase your vision with elegant shot lists and storyboards.
Create robust and customizable shot lists. Upload images to make storyboards and slideshows.
