
Taking a great portrait isn’t about having a quality camera and attractive subject. It’s not even about wardrobe or location. If you mess up the lighting in your portraits, post production won’t always be able to save you. How can you nail it each time? Whether you’re taking school pictures or are shooting athletes for an ad, knowing how to master portrait lighting setups will pay off big.
Portrait Lighting Meaning
Portrait lighting fundamentals
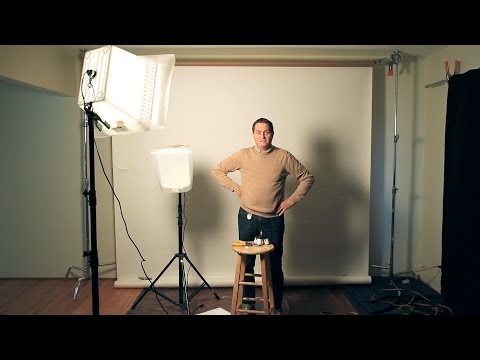
Lighting portraits can be done in a studio or in your home. But if you’re a beginner, taking a great portrait, does not have to cost much. Below, see how one photographer builds a lighting setup on a budget.

How to use studio lighting for portrait photography on a budget
Styles and Patterns of Light
Before we get into portrait lighting setups, something to be aware of…
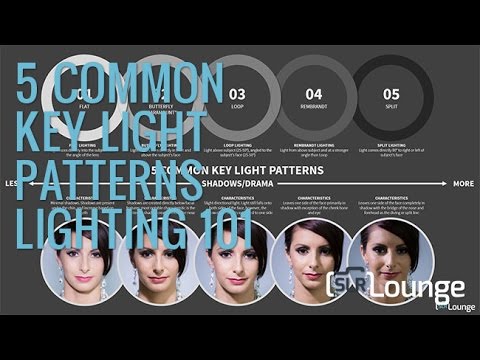
A lighting pattern is the manner in which light interacts with the individual’s facial features to create areas of light and shadow. The critical feature that differentiates patterns is the shape of the shadow cast on the person’s face. The most common of these patterns are butterfly, split, loop, and Rembrandt, which we’ll get into next.
There are also two styles of lighting to know. Short and broad lighting. They refer to which side of the subject’s face is being lit first.
Other Reminders
Before we get into setups, a few quick definitions. You likely already know these, but just as a refresher.
Key Light DEFINITION
What is a Key Light?
A key light is the primary light source for your portrait. It’s most often placed right in front of your subject, at an angle, illuminating one section of them. These angles range from 15 to 70 degrees, with 45 being the most used by photographers and filmmakers.
You can place your key light anywhere, and even bounce it off boards, reflectors or walls.
Just make sure it hits the front of your subject at an angle. Below are some common key light patterns, and we’ll lay them out below in our next section, along with their setups.
5 key light patterns
Now that we've introduced the main source of light, we can go further into portrait setups.
Simple Light for Portrait Photography
8 Portrait Lighting Setups
Now let’s learn how to use portrait lighting with some of these standard studio portrait lighting setups.
Broad and Short Lighting
Imagine a person’s face turned slightly away from you. The side that’s closest to the camera is the broad side because you see more of it. And the side that’s further away is the short side.
With broad lighting, your light is going to illuminate the broad side first. With short lighting, your light is going to hit the side furthest from you, first.

Left is broad, right is short lighting
Butterfly Lighting
This lighting gets its name after the butterfly-shape shadow created underneath the nose. To achieve this look, put the light source above and directly behind the camera, and point it down just slightly on your subject. The steeper the angle, the more intense the shadows.

Commonly used studio portrait lighting setup
Because the light comes from above, some shadows will also be present under the model’s chin and around the cheeks. And the higher the light is placed behind you and above, the longer shadows cast.
However, since there is also light positioned in front of the model, the other shadows lessen for a more even look. This is often used for fashion portraits or even for older individuals.
Front lighting can help minimize the appearance of wrinkles.
Loop Lighting
This kind of lighting is great for standard headshots. If you start with butterfly lighting and then move the position of the light just a little to the side, a nose shadow will be cast on the opposite side.
And instead of a butterfly shape, a small loop appears. Starting from scratch, place your light just above eye level of your model and tilt it at 45 degree angle.
Because everyone’s face structure and nose is different, you’ll likely need to mess around with the light’s angle to get the loop lighting you desire.

Studio Portrait Lighting setup: Loop lighting
Rembrandt Lighting
This kind of lighting has a similar light positioning as loop lighting. Instead though, the light is placed higher and a little further off the axis at a steeper angle. Here the shadow loop of the nose is long to connect with the shadow on the cheek, trapping a triangle shaped light on the cheek.

Named after Dutch painter who used this style
Side or Split Lighting
Split or side lighting keeps half of the model’s face in shadow, and the other half lit. This is a super easy look to achieve, just place the light on the side of your subject. If you don’t want to leave the far side in complete shadow, feel free to add a reflector or board to bounce light onto that side. It will make it look a little less dramatic.

Use side lighting for dramatic effect
Rim and Profile Lighting
Rim lighting is a technique that works really well in sports photography. It’s dramatic and even a little heroic looking, where the light is literally outlining the subject. For this, just place the light right behind the subject. The only thing here is that your subject will be underexposed, so you’ll have to add an additional light to see more of your model.

Rim lighting setup
An offshoot of rim lighting is profile light, where you only capture the subject’s profile. The technique here is to light only the edge of their profile. Have them turn to the side and put the light in front of their face right above eye level.

How to use studio lighting for portrait photography
Fill Lighting
Fill light is responsible for exposing the details of a subject hidden in the shadows of a key light. The fill light is the secondary light in the typical 3 point lighting setup.
Fill lighting is used when one light doesn’t suffice, and you bring in another to compensate. Similar to if you are using rim lighting where the key light is outlining your subject, but you need an additional light to see the subject. But that being said, you don’t always need to use a second light to create fill. You can simply bounce light off your main source with a reflector that acts as a fill.
Understanding fill lighting means understanding the ratio between two lights. The larger the ratio between two lights, the starker the contrast. If you want more dynamic portraits, keep your key light at a certain brightness and your fill at a lower level of brightness.
Portrait Lighting Ideas
Portrait lighting at home
All of these setups can be replicated at home. You don’t need fancy lighting equipment to make it work. It just takes a little bit of innovation.
DIY tips for lighting in your home
Light
What’s available at home? Of course, using natural lighting from a window is a viable option, but if that creates too dramatic shadows on the opposite side of the subject, you can use materials lying around at home to reflect light from the window onto the part of the face with the shadows. If you don’t have a reflector of your own, use cardboard or a white sheet.
Background
For portraits, your background shouldn’t be busy. Keep it simple. A white seamless background is a great option for headshots. Just be mindful of lighting a white background, white paper could end up looking shadowy later.
For a black background try using low-key lighting. This kind of lighting uses shadows and darker tones. This is great for moody, black and white portraits!
Soft or blurred backgrounds are great for portraits. Use a shallow depth of field to capture a blurred background. If you’re using iPhone portrait mode, it does this for you.
The Great Outdoors
If you’re shooting outside, find a tree or landscape backdrop to blur. A blurred tree in the background could contrast well with the defined facial features of your subject.
Up Next
What is Butterfly Lighting?
If you want to go a little deeper into these portrait lighting setups, the next article defines the butterfly lighting technique with more examples to help you master the look.
Up Next: Butterfly Lighting →

Share your vision with elegant shot lists and storyboards.
Create robust and customizable shot lists. Upload images to make storyboards and slideshows.

