
Online storyboard creators give your projects a clear visual plan that communicates your creative goals for your story.
In today’s post, we’ll take you step-by-step on how to make a storyboard in an online storyboard creator. Then we’ll show you how to use free storyboard software to upload your sketches and reference images into ultra-clean layouts while customizing display options as you go.

How to Make a Storyboard in StudioBinder
Free Storyboard Creator
Step 1: Create a New Project
Let’s begin step-by step instructions on creating free online storyboards. The first step in your storyboard creator is to create a new project:

Create a New Project • StudioBinder Storyboard Creator
Once you’ve named your project you can then select the appropriate features for your specific needs. In this case, we are focused on creating storyboards for our scenes, so we’ll make sure our shot list and storyboard creator feature is selected as you can see in the image below:

Select Features • StudioBinder Storyboard Creator
Once you’ve created your project and selected the appropriate features, you can now navigate to the shot list and storyboards feature:

Shot List & Storyboards • StudioBinder Storyboard Creator
Storybaord Creator For Film
Step 2: Import Script or Create Scene
Now that you have your new project, the next thing you want to do is to import your script into your online storyboard creator:

Import Script • StudioBinder Storyboard Creator
This step will allow the free storyboard creator to scan for scene headings in your script which will automatically create a list of scenes in narrative order so that your storyboards connected to specific scenes:

Automatic Scene Generation • StudioBinder Storyboard Creator
If you don’t have a script but you’d still like to create storyboards you can select “new shot list” and choose a name for your scene:

Create New Storyboard • StudioBinder Storyboard Creator
Once you’ve named you scene in your online storyboard creator you can then select the storyboard view as seen in the image below:

Select Storyboard View • StudioBinder Storyboard Creator
Your online storyboard creator will allow you to select the appropriate aspect ratio for your scene. For this tutorial, we’ll select the 16:9 option:

Select Aspect Ratio • StudioBinder Storyboard Creator
Once you’ve made your decision on the aspect ratio of your storyboard cells, it is now time to decide on your shot specifications. This is where your online storyboard creator allows you to describe your shot, select shot size, camera movement, estimated times, and more:

Adjust Shot Specs • StudioBinder Storyboard Creator
Lastly, your online storyboard creator will allow you to select the number of frames (cells) that will be displayed in each row:

Choose Frame Count • StudioBinder Storyboard Creator
StudioBinder allows you to adjust these parameters at any time so you can find the best specs and display layouts in your storyboard creator that will give you the smoothest workflow and the best results.
Online Storyboard Creator
Step 3: Sketch Shots or Gather Images
Now that you have the display and specifications set in your online storyboard creator, it’s now time to sketch out your shots. You can sketch shots on your own, find a qualified storyboard artists, or use reference images for your shots that help to communicate your creative goals:
Add Sketches or Images • StudioBinder Storyboard Creator
StudioBinder provides you with physical storyboard templates so you can sketch scenes with clear labels and specifications. You can also find a great list of professional storyboards that will help with inspiration.
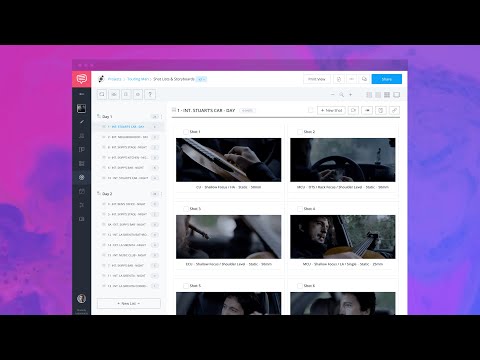
Once you’ve imported all of your images and filled out the desired specs inside the storyboard creator, you can now add notes and camera setups to your storyboard to provide even more clarity for your scenes:
Storyboard View • StudioBinder Storyboard Creator
Notes will give you the ability to create custom breaks in your storyboards where you can add additional information, and camera setups will allow you and your team to build a logistical plan alongside your creative plan.
Free Storyboard Creator
Step 4: Share & Collaborate
Once you’ve completed the storyboard, it’s now time to share it with your team and further improve your scene through collaboration. To share the entire page and all of your completed scenes in your online storyboard creator simply click on the “share” button in the top corner.
You can create a “view only” link that sends the page to anyone while limiting their access so they can only view your storyboard:

View Only Link • StudioBinder Storyboard Creator
Or you can invite collaborators by adding their name and email, and this will give you the option to control their permissions within the page:
- View Only
- Leave Comments
- Edit Page

Invite Collaborators • StudioBinder Storyboard Creator
You also have the option to share specific scenes rather than the entire feature page for your storyboards by selecting the “share list” option:

Share Specific Storyboards • StudioBinder Storyboard Creator
Your online storyboard creator will allow you and your team to collaborate on the storyboards by leaving comments and tasks in the social sidebar:

Leave Comments • StudioBinder Storyboard Creator
This tool gives you and your team the ability to make progress on your creative goals from anywhere at any time, and ensures that your storyboards are as close to the final product as possible.
Professional Storyboard Creator
Step 5: Print & Presentation
Now that you have completed storyboards that have gone through the collaborative steps you have the option to print and/or present.
Your storyboard creator will also give you the option to view your scene as an animatic through a display option labeled “slideshow mode”:

Presentation Mode • StudioBinder Storyboard Creator
Not only can you watch your scene play out in front of your eyes, but you can send your storyboards in this mode to your team. You will be able to discuss and perform necessary changes within the app in minutes.
If you would like to print your storyboards make sure to select all of the specifications and the desired layout beforehand and click “print view”:

Print View • StudioBinder Storyboard Creator
Relevant Keyword Insertion
Create your storyboards for free
Christopher Nolan, Steven Spielberg, Ridley Scott, Denis Villeneuve, and the Coen Brothers all begin their films with detailed storyboards.
Now you have the ability to create and share comprehensive storyboards through an online storyboard creator. Why not get a head start and begin creating FREE storyboards for your next amazing project?Up Next: Create Your Free Storyboard →

Share your vision with elegant shot lists and storyboards.
Create robust and customizable shot lists. Upload images to make storyboards and slideshows.

