
Jordan Peele’s Get Out is already one of the most iconic films of the 21st century. Its simple elegance is a perfect example of how much can be conveyed with so little. In this post, we’ll take a look at The Sunken Place sequence and learn how to maximize storytelling with a minimal budget.
A lot of it boils down to prioritizing a breakdown and schedule. We’ll do this by learning how to identify the key elements that bring a scene to life (and avoid those that don’t). We’ll break down the Sunken Place scene’s sound and VFX elements to get us ready for shoot day. And we’ll practice scheduling a shoot day to make the best use of our resources, time, and energy.
What is the Sunken Place?
1. Plan your vision
Even if you’ve never seen a film by Director Alfred Hitchcock, you probably know that he was known as the “Master of Suspense."
Hitchcock earned this moniker primarily thanks to his meticulous attention to detail in choosing which shots he would need, and how they would be framed, to evoke tension and impact the audience.
In Get Out, Director Jordan Peele follows suit in his own sequence that sends us to “The Sunken Place” for the first time. He describes his intention and the metaphor behind this iconic scene.

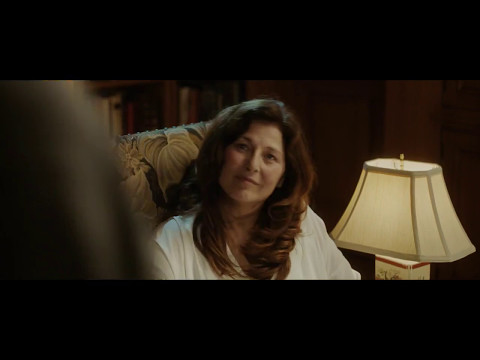
Jordan Peele explains the Sunken Place meaning
When it came time to shoot this sequence, Peele explained in the video above, he felt that the reveal would be, not just a crucial plot point in the story, but a pivotal moment in our collective awareness.
He wanted the Sunken Place to be a broad visual metaphor that would stay with audiences long after the credits rolled. Let's watch the sequence below:
The Sunken Place
So, how did Jordan Peele and his Director of Photography, Toby Oliver, achieve this? And how did they terrify us so much using so little?
One thing they did was to draw our attention to particular elements of the scene that you might not even have noticed at first.
A seemingly ordinary teacup, for example.
How did DP Toby Oliver recognize the significance of the teacup? Because it had been tagged in the scene breakdown.
SCRIPT BREAKDOWNS
2. Break down your scene
Since Jordan Peele also wrote the script for Get Out, he definitely had a clear vision for how he wanted the Sunken Place sequence to look. But that doesn’t mean we can skip the breakdown process.
In order to bring the scene to life, we need to be able to communicate with the other production departments about what elements they have to provide. We do this using the scene breakdown.
SCRIPT BREAKDOWN DEFINITION
WHAT IS A SCENE BREAKDOWN?
A breakdown is simply going through the scene and identifying (“tagging”) all of the elements that it requires like location, props, costumes, or special effects. This process generates a report that you send to the respective departments so they can get those elements together for the shoot.
In the Sunken Place sequence, we actually cut back and forth between three different environments.
The first is Missy’s office…the second is Chris’s childhood home...

Move to a second location
...and the third is described only as “Darkness.”

Third "location"
When doing our script breakdown, once we tag the elements of these three scenes, those elements will remain tagged and display in reports.
We also identified that this single scene actually requires three different shooting locations.
As a result, we'd need to add new scenes for every location to our stripboard so we can appropriately schedule them for production. More on this in a bit.
Related Posts
Tag and Identify Elements
3. Find elements in the action
Let’s look at the first scene of the sequence in the script, which starts in Missy’s office at night. And then we'll break it down.
For a refresher on the breakdown process, watch below to see the various aspects to breaking down a scene using software:

As an example, we've uploaded the Sunken Place scene to StudioBinder so we can explore how to break it down. Click below to see the actual scene breakdown.
You'll immediately notice the scene is mostly dialogue:

Dialogue-heavy scenes typically take up a good deal of real estate on the page, but often they don’t provide much for us to go on when we’re looking for production elements to highlight.
In scenes like this we need to properly identify the cast, and pay special attention to the actions they are performing to find out which additional elements the scene will need.
For example. Taking a look at Missy's Office scene below.
Based on Missy's actions, can you pinpoint all of the elements that are needed in the scene?

Well, for one...we need the teacup and spoon…

Essential element in the scene
… and all the sound elements.
Jordan Peele has made the latter one easy for us, since he follows standard screenplay formatting practices, and emphasizes the key elements in all CAPS to draw our attention to them.
All of these elements would all be identified in the scene breakdown. After that, they'll be shared as a report with the correct department keys to ensure its addressed for the shoot (or in the edit).

Sound elements play a key part in a scene like this, where we are building tension even though little to no action is taking place.
Sound can be either diegetic, meaning the characters in the scene hear it; or non-diegetic, meaning it’s there only for the audience to hear and better understand what’s going on in the scene.
In Missy’s Office, we have diegetic sounds that only Chris “hears” as he remembers the day his mum died.
At Missy’s direction, he starts to hear the rain on the window in his childhood memory, as well as the storm outside his bedroom.
Did You Know?
Most sound elements are added in Post-Production, even if they are diegetic.
In fact, his "memory" is the next scene we need to break down.
The location (small apartment) is given only a sparse description, but there are a couple of things we can note immediately. See below:

One is that the sound elements from Missy’s office will carry over into this scene. With the exception of the "TING," there is nothing to tag for the sound elements, so we need to be sure we put those sounds in the Scene Notes.

The second thing we should take note of is "11-year-old Chris."
Per the script, we’re only going to see his hands and feet. But will Young Chris be played by a child?
Most likely the answer is yes, so we will need to tag the element of Set Chaperone or Set Teacher. These elements can often be missed and that's why it's so vital to meticulously breakdown the script.
Most of the time, a child’s parents act as his or her Set Chaperone, but we still need to make sure it’s accounted for.

The last location is The Sunken Place — or, as indicated in the script, “Darkness." The description of "Darkness" in the script is pretty vivid, so we can easily tag all the elements.
As we breakdown the script, it becomes clear that through the descriptions alone visual effects (VFX) will be required.

Tagging our VFX elements like the “TV-like screen,” and Chris falling in slow motion, will help us later when it comes time to edit. And it will also help us pay more attention to our budget.
After we've successfully broken down this sequence, what's next?
Related Posts
Using Stripboards
4. Organize your shoot day
Thanks to the script breakdown we know the scene requirements. The budget has been updated to reflect the requirements. We can share the breakdown reports and get to task prepping what we can.
Next we can start building the shooting schedule for this sequence!
Our breakdown should have already populated our schedule with all the elements we tagged. Of particular importance are the physical shoot locations and cast as these elements will have a large impact on our shooting schedule.
When we visit the Shooting Schedule page in StudioBinder, you'll see your breakdown information formatted into a "Stripboard" layout. This is where scenes (a.k.a. "strips") are stacked on top of each other and can be rearranged to create a shooting order. As you go, you can add "day break" strips to denote the end of a day.
It works kind of like this:

Yes, stripboards are exactly what they sound like.
Each strip in olden days would made of paper or cardboard. But its modern-day digital counterpart still works the same. Each strip displays key information about the scene that will affect the schedule; particularly cast, page count and shooting location.
These can be moved around to create the shooting schedule like this:

Stripboards use a standard set of colors that identify if a scene is Interior or Exterior and/or Day or Night. Typically it breaks down like this:
- Interior/Day is White
- Interior/Night is Blue
- Exterior/Day is Yellow
- Exterior/Night is Green

The colors on a stripboard make it easy for us to bundle by color (interiors and time of day). Our job is to arrange them so as to maximize our time and energy, including the availability of our locations and any other resources.
SHOOTING SCHEDULES
5. Shoot scenes by location
A lot of factors go into scheduling your shoot day, but one of the most common, especially for low or micro-budget projects, is how long you have access to a location. Other factors might be actor availability, if you’re working with children or animals, or if stunts are involved.
For our purposes, we are going to use the house where Get Out filmed the “Armitage Estate” scenes as our location. This allows us to use the same location for multiple sets.
We’ll label it “Alabama House.”
Let’s start by moving the strips around so that all the matching scene headers are grouped together. That way we can get a clearer picture of how much screen time we will actually be spending in each of the three environments in the sequence.

For example, Missy’s office has the largest Page Count (5 ⅝). Since one page of the script is roughly one minute of screen time, Missy’s office will take up the most time in the finished scene.
Missy’s office is also where all the dialogue takes place. Dialogue-heavy scenes generally mean repositioning the camera multiple times in order to capture the various angles of the actors and other visual information.
Whenever we reposition the camera, that means also having to reset the lighting. Let's figure at least a 15-minute delay each time the camera moves to a new angle. We'll account for this in each strip's estimated "prep time" and "shoot time." These estimates will total up in the next black daybreak banner that follows. This way you know exactly how long your days are going to be.
Our schedule only calculates in hours, so we need to put any fraction of that in decimal form. For example, a 15-minute camera reset means we’ll need to put .25 under the Prep column.
Still, this scene only involves two actors, each sitting across from the other in a big chair. Shooting this scene should be pretty routine, but we’ll know for sure by looking at the shot list.
Related Posts
Scheduling Actors
6. Don't forget about your actors
Speaking of actors, the scene in Missy’s Office is a pretty emotional one for the actor playing Chris. Emotional scenes are exhausting to perform. The actor needs to be able to stay focused and “in the zone” in order to do several takes.
Whenever an actor has an emotional scene, we should try to keep technical interruptions to a minimum.
Now, we don’t know how Get Out actually scheduled this sequence. But since they shot the whole film in three and a half weeks, they probably shot as much as they could each day.
With this in mind, for our example, we’ll go by how the day would look if I were the AD and setting the shooting schedule.
We’ll shoot the emotional scene in Missy’s office first. This will allow us to take our time and not rush the performances, but still leave enough of the day to shoot the Flashback scene.

The flashback scene we will shoot in the Alabama House as well, but we still need to determine where specifically that will be.
Fortunately, we have a little more flexibility when it comes to shooting the flashback scene.
It won’t require sound since it has no dialogue.
It’s set at night and doesn’t involve any blocking (actors moving around) so lighting shouldn’t take long. Check out our entirely free masterclass on these and other, filmmaking techniques.
We don’t see the actor’s face so hair and makeup won’t be needed.
This set can be rigged up at the beginning of the shoot day and left “hot” (fully ready to shoot) until we get to that scene.
In short, the flashback shouldn’t take up much of our shooting day. The only thing we really need to keep in mind is that, as a child performer, our Young Chris will only be available for a limited number of hours.
Related Posts
Sunken PLace & Soundstages
7. Set up a soundstage
Shooting the Sunken Place itself will require a dedicated space where we can control the environment entirely. That means a soundstage.
The “soundstage” used in Get Out was actually a multi-purpose room in public building in the same town as the main “Alabama House” location.
DP Toby Oliver, who has a strong pedigree of shooting horror films, drew a detailed sketch (called a “mud map”) of how to create the eerie, limbo world of The Sunken Place using only a few light sources.

Since our soundstage is nearby, we can send Riggers and other Grip/Electric crew there at the start of our shoot day to prep for the Sunken Place scene.

Toby Oliver's Mud Map
Then, when our Chris is wrapped on the Missy’s Office scene, we’ll send him over to the Sunken Place's soundstage. He won’t even need to change his wardrobe.
We will only need the crew who are already at the soundstage location to shoot everything we need, plus a few key personnel like the Director and DP. They can travel to the soundstage with Chris.
In terms of schedule, while Chris, the Director, and DP are en route, we can use a Second Unit to shoot the Flashback scene at Alabama House.
This way, we should be able to shoot the entire sequence in a single day.
CONCLUSION
8. Wrapping up
To recap, when creating a shooting schedule, remember to try to keep things smooth and easy.
1. Location
Shoot everything that happens in one location at the same time before moving to another location.
2. Be Efficient with Company Moves
It’s better to shoot different locations on different days than to move the whole crew in the middle of the shooting day. But if locations are close enough together, breaking up the crew into smaller units can help you get through the overall shooting schedule more efficiently.
3. Try to Limit Camera Moves
Be mindful that moving the camera usually means resetting the lighting and of how much time this takes.
4. Think About Your Actors
Be mindful of scheduling scenes that are hard on the actors (i.e. emotional scenes, stunts).
5. Don’t Forget To Schedule Meal Breaks
A hangry crew isn’t very helpful or efficient.
Mastering the script breakdown is vital to your shooting scheduling. And by implementing these scheduling tips, your production will run smoother and be much more likely to stay within budget and on track.
Related Posts
UP NEXT
Break Down Westerns like Westworld
Hungry for more? Some scenes aren't that easy to breakdown. Some, based on genre alone, require an even more meticulous scan. Now that you have an understanding of how to break down scenes with VFX and sound elements, let's take it to the next level:
Westerns!
Extraordinary sci-fi westerns like Westworld often require many unique considerations of elements like period costumes, horses, stunt work, specialty props, mechanical effects, etc. Learn how to master the madness of breaking down a Western below.

