If you’ve used StudioBinder’s project management tools before, you know the value of managing a project collaboratively under one roof. However, for those of us who work in commercial television production using AV scripts, we’re left on the outside looking in, right? Not necessarily. The way I see it is, StudioBinder is a tool which can be used in many ways. Knowing how to make a commercial on TV starts and ends with understanding how these tools work. Come along as I adapt Hulu’s Better Ruins Everything ad using all of StudioBinder’s features designed for the entire TV commercial production process.

Commercial Television Production

First, what’s an AV script?

The TV commercial production process starts with a script. But this typically isn't a normal screenplay for a movie or TV show. With TV commercial production, we're almost always dealing with what are called AV scripts. 

Before we get into the TV commercial production process, let’s go over what exactly an AV script is and what types of projects use this format.

AV SCRIPT DEFINITION

What is an AV script?

Audio visual (AV) scripts separate the audio and video components of the script into two columns. The Audio column contains information about the narrator (character), dialogue, or any sound(s) heard corresponding to the video description in the video column. The Video column describes the scene or shot corresponding to the narration in the audio column.

Common project types that use AV Scripts:

  • Commercial/Advertising
  • Corporate Videos
  • Documentaries

Alright, now that we’re clear on what an AV script is, let’s jump into StudioBinder so you can see how I use the tools to my advantage.

TV Advertising Production

1. Adapt the script

Ok, I just want to preface that the order of these steps are a workflow that I’ve found that works for me. That being said, some steps may not be necessary for you depending on your specific needs.
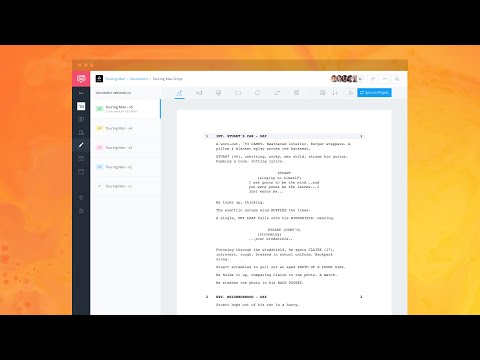
So, you’ve written your script using an AV script template and you’re ready to start scheduling and planning the shoot. StudioBinder was built around the industry standard screenplay format, so, what I do is adapt the AV script. That way I can sync the script to the project and begin the Pre-Production process.

Alright, so the very first thing I do is upload my original AV script to the Media Library page of my project in StudioBinder.

Project overview page - Media library button

Project overview page  •  Media library button

That way I always have the original in the project that I can easily refer to.

To upload the file, on the Media Library page, click Upload Files...

Media library page - Click upload files

Media library page  •  Click upload files

...and then drag and drop your AV script file onto the page.

Upload files pop-up - Drag and drop file

Upload files pop-up  •  Drag and drop file

Now, you’ll have the original file to come back to anytime you need.

Media library page - Original av script file

Media library page  •  Original AV script file

Alright, with the file in the project, now, I’m going to head over to the Documents page by using the navigation sidebar.

Navigation sidebar - Documents button

Navigation sidebar  •  Documents button

Here, I’m going to create a new screenplay document by clicking the +New Document button...

Documents page - Click +New Document

Documents page  •  Click +New Document

...select Screenplay, click next, give it a name and click Create Document.

Name your document - Click create document

Name your document  •  Click create document

Ok, so now here is where I adapt the script. I like to pull up the original AV script in one browser window and have my screenplay document open in another window.

Documents page screenplay - Media library av script

Documents page screenplay  •  Media library av script

To show you how I’ve adapted the AV script, let’s look at the first row of the AV script.

AV script - First row

AV script   •  First row

“VIDEO: Over head MCU of JAMES lying on a bed. Speaks directly to camera as the camera pushes in.” “AUDIO: Music Somber, James: Listen Carefully…”

Now jumping back to the screenplay document, you can see the first scene I’ve created.

All contacts page - Search by role

All contacts page  •  Search by role

You can see I’ve begun by adding my first scene heading. “INT. BEDROOM - DAY,” if you’re wondering how I came up with this, it’s all from the AV script.

Screenplay document - Scene heading

Screenplay document  •  Scene heading

It says he’s lying on a bed, so it's pretty safe to say the setting is a bedroom and it is indoors (INT.). The time of day indicator is up to you. I know we’ll be shooting this particular scene during the day, thus the “DAY” time of day indicator.

Now, just as in a screenplay, the action lines act as both the audio and video columns. The great thing about this is because it is not a typical screenplay document you can put whatever you want there.

Screenplay document - Action lines

Screenplay document  •  Action lines

pro tip:

The more information you put into the action line section of your script, the more you will be able to tag once you’ve started breaking down the script.

Then, I format “JAMES” as a character and input his dialogue.

Screenplay document - Character and dialogue

Screenplay document  •  Character and dialogue

From there, I add any additional sub-headers for all of the scenes with James in Bedroom.

Screenplay document - Sub-header scenes

Screenplay document  •  Sub-header scenes

I continue this process creating a new scene heading for each new character and setting. Once I’ve finished, I sync the script to the project using the Sync to Project button.

Screenplay document - Sync to project button

Screenplay document  •  Sync to project button

This populates the script across the entire project so I can begin the pre-production process.

Alright, now that you know how to adapt an AV script into a screenplay format, let’s head over to the Breakdowns page to see our synced script.

Producing a Commercial

2. Breakdown the script

When breaking down a script, you’re essentially taking inventory of everything you’re going to need to make that scene or script come to life.

Before we begin our breakdown, let’s see how the process is done.

How to make a script breakdown  •  Subscribe on YouTube

Alright, here on the Breakdowns page I’ve tagged all of the elements necessary to film this scene.

Breakdowns page - Scene elements

Breakdowns page  •  Scene elements

I’ve also tagged the physical location where the scene will be shot using the scene heading strip.

Breakdowns page - Tag physical location

Breakdowns page  •  Tag physical location

One thing I really like about StudioBinder’s breakdown feature, is that it let’s me create custom element categories to fit specific needs. So anything that you need to have on set you can create a category for and tag it during the breakdown process.

For example, I had the camera department come in and tag the camera and lens they will be using for this particular scene.

Custom element category - Camera category

Custom element category  •  Camera category

Another thing I love is when you’re finished with the breakdown process, all of this work is automatically added to the breakdown report.

From the breakdowns page, hover over the scheduling icon on the navigation sidebar and select Reports.

Navigation sidebar - Click reports

Navigation sidebar  •  Click reports

The breakdown report lists scene by scene all of your tagged elements so you have an easy to read document with everything needed to bring the commercial to life. As you know TV advertising production is just as dependent on organization and efficiency as any other motion picture production.

Reports page - Breakdown report

Reports page  •  Breakdown report

Another huge advantage of tagging all of these elements is when you spin-off a call sheet from the shooting schedule, they are all added to the call sheet automatically.

Call sheet - Tagged elements

Call sheet  •  Tagged elements

This makes sure every department knows what they are responsible for on the day. Ok, so you’ve seen how to adapt the script into a screenplay format to sync and start the breakdown.

Now, what I typically do is jump over and create a shot list.

Shooting a TV Commercial

3. Create a shot list

Filmmaking is a visual medium and the shot list is where the visuals start to come to life. You can think of the shot list kind of like a blueprint of the project. Before we get into how I use the shot list feature, let’s see how to shot list in StudioBinder.

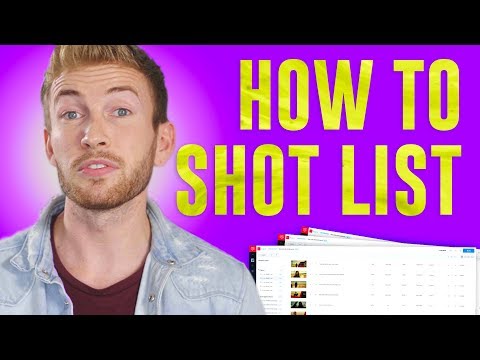
How to shot list  •  Subscribe on YouTube

With StudioBinder’s shot list feature I’m able to have multiple lists and views for different scenarios.

For example, I like to view the storyboard layout with a single frame per row, because it’s literally an AV script. Check it out.

Storyboard layout - Single frame per line

Storyboard layout  •  Single frame per line

Like I mentioned before, you might not want to adapt the script into traditional screenplay format, so you could literally come here to the shot lists & storyboards page and plug all of the information from your AV script here.

To get this view, select the storyboard layout from the toolbar…

Storyboard toolbar - Storyboard layout button

Storyboard toolbar  •  Storyboard layout button

...and select one frame per row.

Storyboard frames - One frame per row

Storyboard frames  •  One frame per row

Plus, with all of the different shot spec options, you have one document that can serve multiple purposes.

Shot spec options - Enable or disable

Shot spec options  •  Enable or disable

For example, say you need to share this with the client so they can see your vision coming to life. They don’t necessarily need to see what camera or equipment is being used. So just disable/hide the specs and you’re all set.

Storyboard layout - Simplified shot specs

Storyboard layout  •  Simplified shot specs

So rather than words telling them what they’re going to see, you can insert a reference image or even have a professional storyboard artist create frames for you. Like they say, show, don’t tell.

Alright, you’ve seen me adapt the script, break it down, and create a shot list that mimics an AV script. Now, my next step is to create a shooting schedule.

TV Commercial Production Schedule

4. Create a shooting schedule

A shooting schedule is essential in the TV commercial production process. It's a plan that every film, TV show, and commercial follows to make sure the production goes smoothly. It's a simple breakdown of the scenes, talent, time, cast, company moves, and day breaks.  

StudioBinder makes creating a shooting schedule really easy. Since I’ve adapted the script and synced it to the project all of my scene headings have been made into a stripboard on the Shooting Schedule page.

For more, here are tips on understanding the scheduling hierarchy.

Shooting schedule page - Stripboard

Shooting schedule page  •  Stripboard

Now, I can begin to drag and drop my strips into place to set my shooting schedule. To make sure we’re doing this right, let’s hear from filmmaker Arnon Shorr on how to set a shooting schedule.

How to set a shooting schedule  •  Subscribe on YouTube

I went ahead and followed Arnon’s instructions and I’ve set my shooting schedule. 

Shooting schedule page - Populated stripboard

Shooting schedule page  •  Populated stripboard

You’ll notice that I don’t have all of the strip information enabled, such as the pages option which tells you the page eighths of your script.

Shooting schedule page - Choose Pages

Shooting schedule page  •  Select Pages

Since the page eighths don’t really matter in the commercial world, there isn’t a need for them to be included on the stripboard.

I also like to include my start time(s) if I have them, as well as an estimated time for how long it will take to set up and film each scene.

Shooting schedule page - Est. time and start time

Shooting schedule page  •  Est. time and start time

This is all important information that everyone will need to be made aware of. We are now one step closer to completing the entire TV commercial production process. But there's one more important step in commercial television production — we need to create a call sheet.

TV Advertising Production

Distribute call sheets

Speaking of making everyone aware, now, with a fully populated shooting schedule we can begin to spin-off call sheets. Which in short, takes all of the work we’ve done and imports it into the call sheet. Eliminating having to input information over and over again.

Spun-off call sheet - Imported shooting schedule details

Spun-off call sheet  •  Imported shooting schedule details

To spin-off a call sheet, from the shooting schedule page, click the “+” button on the day break for the group of scenes you'd like to create a call sheet for…

Shooting schedule page - Spin-off call sheet button

Shooting schedule page  •  Spin-off call sheet button

...enter the details such as a name and general call time then click next

Call sheet builder - Enter details

Call sheet builder  •  Enter details

...add your call sheet recipients and set individual call times, even add an optional private message if necessary then click next

Call sheet builder - Add recipients

Call sheet builder  •  Add recipients

Now, you have a call sheet that is 90% populated and you only need to fill in the specific details.

Feature-film-call-sheet-template - Spun-off-call-sheet

Feature film call sheet template  •  Spun-off call sheet

So, as you can see although StudioBinder was built around the screenplay format, I was able to get creative and make it work through the TV commercial production process. Is it perfect? No, but does it work for me? Absolutely. Like they say, when life hands you lemons, make lemonade. Cheers.

UP NEXT

Team collaboration

Alright, you’ve seen how you could manage a commercial project in StudioBinder, but what if you have a team you’re working with? Come see all about team collaboration in StudioBinder. How do you manage your commercial projects? Let us know in the comments!

Up Next: Collaboration →
Solution Icon - Collaboration and Production Calendar

Project management for video creatives. Tasks, file sharing, calendars and more.

Manage video production timelines, tasks, storyboards, shot lists, breakdowns, call sheets. Made for video creatives, new media and film.

Learn More ➜

Leave a comment

Your email address will not be published. Required fields are marked *

13 Shares
Copy link