
Becoming highly-skilled at any craft always starts with learning and honing the fundamentals. So of course, if you want to become a photographer, knowing how light interacts with your camera and how to use that light to produce well-exposed images, are good first steps. In this post, we’ll lay out a few examples to answer specifically, what is underexposed photography, and how you can manipulate the scene to create underexposed images that work for you instead of against you.
Underexposed Photography Definition
First, let’s define underexposure
Exposure is the amount of light that hits your camera’s sensor. Controlling that amount is the job of the photographer! There are of course overexposed shots and underexposed shots. What does underexposed mean?
Underexposed Photography Definition
What is underexposure?
Underexposure is when an image appears darker than it should, or darker than neutral exposure. An underexposed image is the result of not enough light hitting the camera’s sensor. Underexposed images often lack detail and the objects or subjects can even blend together in the shadows of the image.
The photographer controls the amount of light that gets into the camera in order to reduce the possibility of underexposure. Camera settings, aperture and shutter speed, control exposure because they are responsible for collecting light into the camera. ISO, another setting, adjusts brightness but doesn’t serve to draw light in and so doesn’t regulate exposure.
Avoiding Underexposed Photography
- Ensure you have enough light
- Adjust aperture settings
- Adjust shutter speed
- Increase ISO
What does an underexposed image look like next to a correctly exposed shot? What about overexposed? Finding the happy medium between these extremes is how you avoid underexposed photography. Check out our blog post highlighting the contrast between overexposure and underexposure.

Overexposure vs underexposure
And we’ve all seen underexposed photography in film as well. You might see something like this:

Underexposed Film • Objects lost in the shadows
While this shot looks fairly interesting, it takes me quite a bit of time to figure out what I’m looking at — an escalator? The objects in the middle seem to blend into the escalator itself and even the walls blend with the floor.
It’s hard to make out any details aside from the semi-overexposed bright lights shining down. Underexposing subjects instead of objects, doesn’t give as much “artsy” room to play with. Mainly because when people are in shots, or on screen, we want to see them, their expressions, what they’re doing.
When the medium is visual and we have to strain to see the characters, it can feel a little frustrating to the viewer.

Underexposed film: Can’t see features of our characters
Of course, there are always times when this makes sense, especially in film.
To convey a particular feeling, or to increase tension, underexposing images can be a great technique.
Horror or suspenseful movies come to mind.
The Blackcoat’s Daughter: underexposure to elicit fear
If you want the audience to wonder what could be lurking in the shadows, you should probably create some shadows...

Underexposed Film • Made Me Do It
As a photographer or cinematographer you have the unique ability to truly control what a viewer sees. You control the light so you control the picture (yes, obviously the director has a say), but your ability to capture light in such a way that helps you better tell the story is a huge part of the job.
It’s not only technical but highly creative, and underexposure has the possibility to be your good friend. For a complete breakdown on exposure, make sure to download our FREE ebook: The Ultimate Guide to Exposure.
Free downloadable bonus
FREE Download
Ultimate Guide to Exposure
The Exposure Triangle is something every photographer and cinematographer needs to master. Download our FREE e-book to get in-depth explanations and tutorials on topics like aperture, ISO, shutter speed, and how to balance these settings to nail perfect exposure every time.


Tips for Preventing Underexposure
Adjust your camera’s settings
Luckily you don’t have to be a light expert or cinematographer to produce and take perfectly exposed shots. All you really need is a basic understanding of how to gather light in your camera.
Knowing how aperture, shutter speed, and ISO work together will give you consistently and properly exposed shots whenever you want them, (which is likely, almost always).
Let’s do a quick rundown.
Remind me again, what’s aperture?
Aperture is represented by f/stops. It adjusts how wide or narrow your lens opening is. The wider the aperture, the more light comes in, and the narrower the aperture, the less light comes in. Pretty straightforward. It also affects how deep or shallow the depth of field is.
And...shutter speed?
As a refresher, shutter speed just refers to how quickly the shutter opens and closes. The longer it stays open, the more light will come in.
What’s ISO?
ISO doesn’t have anything to do with exposure but it does control the brightness to avoid over or underexposure. It represents light sensitivity.
How do they all work together to ensure you don’t get underexposed pictures?

Know the exposure triangle: prevent underexposed images
Say you’re in a dim-lit room, with no lighting guy (or girl), what do you do? Well first, make sure your ISO is up, that will increase your brightness, but also widen your aperture, as that will let more light in.
Depending on how dark the room actually is, you could also slow down your shutter speed to let even more light in. But keep in mind, there are more considerations and things at play here.
Aperture controls more than just light; it controls how deep your depth of field is or how shallow your depth of field is.
If you want a deep depth of field for sharper focus, you’ll need a narrower aperture — this will affect your exposure and this is where a flash or some other kind of lighting might be needed.
Fix Lighting in Photos
How to edit underexposed photos
First things first, know how to properly expose your shots before you get to post. It will save you so much time and problems.
That being said, knowing how to fix overexposure in post-processing in programs like Adobe Photoshop and Lightroom is essential.
Go through this step by step tutorial of how Julia Trotti is fixing her underexposed image in Lightroom.
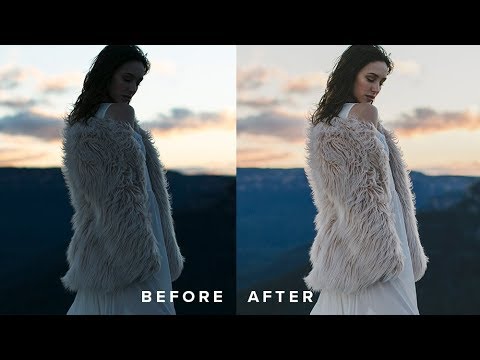
How to edit underexposed photos in lightroom tutorial
In Lightroom, use the Basic Panel. Start with using the Exposure slider.
Exposure Slider
This is for brightening your image globally. This slider is particularly sensitive to each adjustment. Small ones have a pretty big impact, so adjust slowly. You can raise the exposure by pulling this slider to the right.
Highlight Slider
Adjust this slider for the smaller details. In the video above, see how she adjusts it so slightly to bring the sky’s details back into the image.
Shadow Slider
Like the Highlight slider, this one boosts underexposed areas of your images well. It can bring structure back. Pull this to the right.
If these adjustments aren’t enough to remedy the issue, try Lightroom's other tools.
You can use a brush or radial filter to brighten your subject without touching the background. Gradient filters brighten a dark foreground without overexposing the background or sky.
But if you don’t have Lightroom, no worries. You can do similarly cool fixes in Photoshop.
How to increase face brightness in photoshop
Underexposed pictures are especially irritating when it comes to portraits or people. When you have underexposed shots, you’ll have desaturated colors making skin tones look less than ideal. Luckily, this can be easily and quickly remedied in Photoshop.
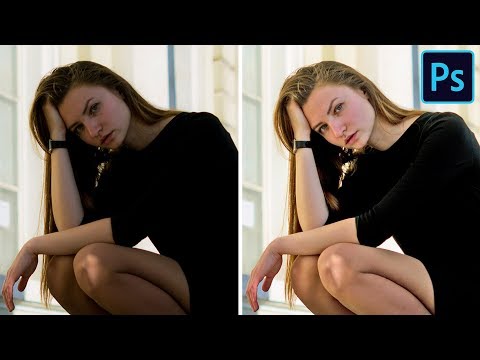
Learn to increase face brightness in photoshop
First duplicate your background layer. Similarly to Lightroom, find your Shadows and Highlights sliders. Adjust to the right accordingly.
In the video, we saw his example of avoiding the highlight slider for this particular image, and using the shadows. He also went down to the general Adjustment slider and increased the color to make the image pop. You can quickly see the before and after.
If you need more contrast to the photo, or need more brightness still, you can add a curve adjustment layer in order to draw out the highlights of your shot.
Go to Layer > New adjust layer > Curves. You can then drag the curve up to your desire. If you invert your layer mask and paint white with your brush tool, you can see the skin tone gets lighter. But you might not want everything brightened at the same time here. You’ll likely just want to brighten the highlights so it looks more natural.
If you go back into your curves adjustment layer and find the slider for Underlying Layer. Click alt or option to drag the darker slider to the right. This will add a little more brightness to your highlights.
Continue reading for more of the fundamentals or better yet, go start shooting.
UP NEXT
What’s ISO & how does it work?
If you do have underexposed shots, post-production software might help, but ultimately it will only be salvageable to a certain degree. You’ll likely never get to that point once you’re comfortable with your camera’s settings, especially ISO. Continue reading for more on how it works with a camera’s other settings.
Up Next: ISO explained →

Share your vision with elegant shot lists and storyboards.
Create robust and customizable shot lists. Upload images to make storyboards and slideshows.

