
During a photoshoot, there are many variables and details to keep track of shot to shot. Lighting, camera framing, wardrobe, and poses can all change from one shot to the next. One of the best tools to ensure that every shot contains the details you desire is the photography storyboard. Photography storyboards allow you to visualize and define your shots before the day of the shoot. In this article, we’ll take a look at how to make a storyboard for photography as well as the details to define when creating one.
How to Storyboard Photography
Let’s define photo storyboard
A storyboard is a great tool to both refine your vision and plan your photo shoot. Before we dive into how to create one, let’s take a look at the photo storyboard definition.
PHOTO STORYBOARD DEFINITION
What is a photo storyboard?
A photo storyboard is a visual representation of a video or still photo shoot. Storyboards break down a photoshoot shoot shot by shot in individual panels. Each panel in a storyboard defines specific shot details visually and through text. Storyboards allow photographers to define and refine their vision for a shoot while creating a blueprint to use on set for themselves and their team.
Shot details defined in a storyboard for photography:
- Subject poses
- Shot framing
- Camera angle
- Wardrobe
Creating a photography storyboard does not have to be a daunting or tedious task. Let’s dive into the steps that make creating a photography storyboard easy, fun, and effective.
How to Make a Storyboard for Photography
Curate a mood board
Whether you are shooting portrait photos, conceptual photos, or commercial photography, curating a mood board will help you better define your thoughts and vision.
Creating a mood board is by no means essential to creating a photography storyboard, but it is incredibly beneficial. As you create your mood board you will inherently think about things like color schemes, wardrobe, props, lighting, etc. in your photoshoot.
Here are a few tips to create your own photography mood board by the YouTube channel Mango Street. In the video below, they outline the purpose, process, and use of a mood board.

How to make a storyboard for photography: Conceptualizing
Mood boards are meant to help you refine your vision and serve as a tonal reference for anyone involved with the project. Don’t limit yourself to photos that you want your photos to look like.
Include images like props, wardrobe, colors, or even attach music files to your mood board if it’s created online. The idea is to create a cohesive vision that encapsulates the mood of your final photoshoot.
Once you’ve created a detailed mood board and are happy with the final product, it’s time to transfer this visual direction into something more organized — a storyboard.
Related Posts
How to Storyboard Photography
Choose your storyboarding tool
Mood boards are great at visualizing the tone and mood of a photoshoot as a whole. However, they fall short of defining each shot. That’s where the storyboard comes in.
When you storyboard photography, start by choosing your storyboarding tool. You can opt to use a storyboard template and storyboard by hand. But believe me when I say using a storyboarding software, like StudioBinder’s free storyboarding app, is much easier, more efficient, and more effective.
Give the video below a watch to see how StudioBinder’s storyboarding software works and how it can help you create your photography storyboard.
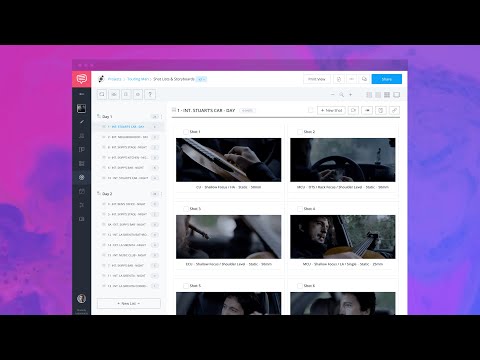
How to make a storyboard for photography • Free Storyboard Creator
Once you’ve chosen your storyboard tool and created your project, it’s time to flesh out the storyboard with shot details and visuals. This is where rough ideas become refined and organized.
Related Posts
How to Storyboard Photography
Define shot details
There are many details to take into account for every shot in a photo shoot. These details can be difficult to keep track of or remember without properly defining them within your storyboard. Let’s take a look at a few details that you might want to define in your storyboard.
Shot size
The very first thing to determine in your storyboard is the size of your shot. You can select any of the different types of shot sizes that best define the shot.

Shot sizes • photography storyboard templates
If you're not sure what type of shot size your photo will be, take a look at our complete video breakdown of shot sizes below. While the video utilizes examples from cinema, the shot sizes are still relevant to still photography.
![Ultimate Guide to Camera Shots: Every Shot Size Explained [The Shot List, Ep 1]](https://i.ytimg.com/vi/AyML8xuKfoc/hqdefault.jpg)
how to make a storyboard for photography: Every Shot Size • Subscribe on YouTube
Shot angle
In addition to shot sizes, different types of shot angles can be a defining characteristic of a photograph. This is especially true when shooting commercial photography in which various angles are taken of the same product. You can define different angles like overhead shots, eye-level shots, and more in the “Shot type” field.

Shot type and angles • photography storyboard templates
Camera lenses
A more technical aspect of photography to keep in mind of is the type of camera lens you will be using. Different types of camera lenses have varying effects on how a photo looks.
For example, wide angle lenses can be rather unflattering for shooting portraits. Telephoto lenses are more flattering for models and subjects. Give the video below a watch to better understand the varying effects of every type of camera lens.
![Ultimate Guide to Camera Lenses — Every Type of Camera Lens Explained [Shot List Ep. 7]](https://i.ytimg.com/vi/uSsIqR3DuK8/hqdefault.jpg)
How to storyboard photography • Guide to Camera Lenses • Subscribe on YouTube
Utilize the “Camera lens” field to define the type of camera lens you will be using for each shot. This will save you time during your photo shoot and remind you to use the lens that best captures your desired shot.
Poses
If you are shooting portrait photography, fashion photography, or a shoot involving a model, capturing a variety of poses is important. You can define each shot’s pose in the “Shot Description” field. For example for the photo below, the shot description might be “Look over shoulder.”

Poses for photography storyboard ideas
Lighting style
If you are shooting in a studio or in a controlled lighting environment, you’ll most likely be curating and setting up your own lighting styles. This can be geared toward shooting high contrast photography with a single key light or high-key product photography.
Whatever the lighting style may be for a shot, you can define it in the “Lighting” field of your shot’s details.

How to make a storyboard for photography • Lighting Styles
Location
Depending on what you are shooting, you might have various locations for one shoot. For example, it’s not uncommon for a commercial shoot to be shot both in a studio or on location.
Studios have the benefit of being a controlled environment in which lighting and backgrounds can be more controlled. Locations, however, can provide unique backdrops that are great for lifestyle photos.
If your shoot entails multiple locations, take advantage of the “Location” field in the shot details. Below, we filled our shot location with “Studio.”

How to storyboard photography • Location for photo
These are only a few details to define within your storyboard. The more detailed you can be in defining your shot details, the better prepared you will be for your photography shoot.
Related Posts
How to Make a Storyboard for Photography Online
Upload images
A storyboard would not be a storyboard without visuals. Once you have defined each shot’s details, it’s time to upload an image that visually represents each shot. These images can be sketches, inspirational photos from your mood board, or photos with similar framing and/or posing to your desired shot.
We created a sample storyboard for a product photo shoot in which we uploaded inspirational images based on camera framing and product posing. Check out our example storyboard by clicking the link below.

Photography storyboard examples
Remember, the images you upload are going to be used simply for direction. Select the images you upload based on what will benefit you the most.
This might be images to show your model to give them direction on posing or it may be images selected based on lighting style. Your storyboard is meant to benefit you as the photographer. Design your storyboard with this in mind.
Sharing You Storyboard Photography
Print and share your storyboard
Once you’ve completed your storyboard, it is not a bad idea to share it with your team or client. This will make sure everyone is on the same page as to the visual direction of the shoot.
For your crew and talent, everyone can look at the storyboard and understand what will be executed during the photo shoot. For clients, a photo storyboard will give them something to approve or give feedback on before you actually move forward with the shoot.
It can also help you visually present your ideas to clients.
You can print your storyboard and physically share copies of it. You can also share it digitally by adding collaborators or sharing the link on the StudioBinder storyboarding app.
Up Next
What is the Best Lens for Portraits?
If you are shooting portraits in your photoshoot, it is important to be intentional with the type of camera lens you use. In our next article, we take a deep dive into the best lenses to use for portrait photography and which lenses you might want to consider for your photo shoot.
Up Next: Best Lens for Portraits →

Share your vision with elegant shot lists and storyboards.
Create robust and customizable shot lists. Upload images to make storyboards and slideshows.

